The Batonnet Cut: A How-To Guide for Any Vegetable
When it comes to mastering the wonders of the culinary world, getting your knife skills in order is just as important as learning how to use all your pots and pans the right way. While imperfectly diced vegetables won’t ruin a dish as much as burning those veggies will, creating diced veggies of different shapes and sizes prevents even cooking.
You’ll need to cook long enough to caramelize those large chunks, but then you’ll find that smaller pieces have burnt and become crispy, adding a charred, unsavory flavor to your meal.
Today, we will teach you the art of the batonnet cut with a step-by-step guide that will give you perfect and even slices every time. You’ll be making perfectly sliced French fries and veggie sticks in no time. Your friends will want to know where you’ve been getting your take-out.
What Is a Batonnet Cut?
In French, batonnet translates to “little stick.” This also describes what shape you will have as a result. Utilizing the batonnet cut will leave you with ingredients that look like strips of food, about ¼” thick.
This is the ideal cut for french fries, veggie sticks, or ingredients found in a taco slaw or stir fry. When done correctly, the ingredients are uniform in shape and size, cook evenly, and look aesthetically pleasing when piled high on a plate.
You may have also heard of the “julienne” when learning knife skills. These terms are interchangeable and describe the same type of cut and shape of your ingredients. The batonnet can also be referred to as the matchstick cut, but they all return the same results no matter which way you slice it.
Chiffonade is another French technique that cuts leafy greens into long, thin strips. This will work very similarly to how a batonnet cut will give you perfect pieces of veggies, but with a slight modification.
The batonnet cut can also be utilized for dicing or chopping ingredients. This is known as a brunoise. Make sure all your strips are the same length and width, stack a few together and create perfectly diced pieces to saute. Even pieces make them easier to handle. It’s a cinch to slice and dice.
You’ll have the control to decide between a small dice, a medium dice, a large dice, or mince, without having a hard time creating the right size pieces for your dish. Your hash or stew recipes will come alive with perfect-sized pieces for even cooking.
What Are the Perks of Batonnet Cuts?
Learning these knife cuts are important. As a home cook, learning even the most basic knife skills will up your kitchen game. Below are a few key points you’ll want to consider if you’re contemplating skipping this culinary lesson.
Get Equal and Uniform Pieces
Equal and uniform pieces don’t just make your food look good. They keep everything else even and uniform as well. This means that roasting a plate of carrots or frying a batch of French fries, which, coincidentally, aren’t actually French, will be easier with a batonnet cut.
Why? Well, you have to cook the food long enough for everything to be thoroughly cooked and prepared. If your pieces are of varying sixes, you’ll have to keep food in the oven or fryer long enough to cook the biggest pieces. If other pieces are smaller, then they’ll overcook, burn, or cause your food to lose shape and texture.
If everything is uniform and even, food will cook consistently, and ingredients will retain their integrity. It makes every main or side dish uniform.
Cut Ingredients Down to Finger Food-Sized Pieces
Not only will food cook better when everything is even, but by using a batonnet cut, you’ll create uniform cuts for perfect-sized finger foods. Pick up raw carrots or french fries easily. Your veggie trays will have a uniform eye appeal that’s easy to eat — they won’t be too big or too small.
These perfectly sized bits of food are ideal for enjoying dinner. Imagine fries that you have to eat with a fork and knife or a piece of raw carrot so small that you can’t dip it. It’s not ideal and takes away from the experience.
Speed Up Your Kitchen Workflow
While it may take some time to perfect your knife skills in the beginning, using a batonnet cut will get easier and more efficient over time.
As you get comfortable with the technique, you’ll see how much time you save in the kitchen, leaving you open to enjoy more time with guests while everything cooks.
What Knife Should You Use for a Batonnet Cut?
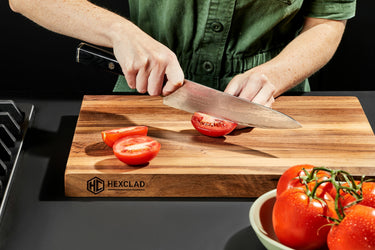
To perfect this cut and slice through even the starchiest vegetables like butter, you’ll need a chef’s knife that is strong and durable. Skip the dull knives. Those are a danger to your fingers.
We recommend our Damascus Steel 8” Chef’s Knife. This baby can go the distance and keep coming back for more. Its handle is designed for the most comfortable grip, making chopping all those tough vegetables simple.
Yet, it’s also delicate enough to make the sharpest and quickest slices through leafy greens without bruising the veins. One week with this tough guy, and you might forget any other knife exists.
How Do You Batonnet Veggies?
Learning how to batonnet veggies isn’t so hard that you can’t do it, but it will take some time to perfect. You’ll need to practice a lot, but before you know it, your veggies will be evenly sliced every time — without you even having to think about it.
The important thing is to follow these steps and do them in this order. Trying to cut veggies before washing them or slicing all the ends off at the end can take more time than needed because you went out of order.
Don't get discouraged if your pieces don’t come out perfectly even the first time. The process will get easier, and your slicing skills will get more efficient the more you practice. Don’t be afraid to skip the restaurants or take-out menus this weekend in favor of working on those chef skills.
Step One: Wash Your Veggies
Always wash your veggies before using them. We’ll repeat that: always wash your veggies before using them. You never want to cut your veggies first and then wash them later. Not only will it be harder to slice and dice, but your knife will be covered in leftover residue from packing and shipping the veggies. You will pass those on to everything else your knife touches.
Run your fruits and veggies under cold water and pat dry. For really starchy vegetables, like potatoes, carrots, or sweet potatoes, you’ll need to scrub the skin clean before patting them dry. You can scrub with your hands, a standard kitchen brush, or a special potato scrubber to get the dirt off the skin.
Step Two: Peel If Needed
Peel your veggies. If it is difficult to wash veggies after cutting, it is next to impossible to peel them after chopping. Not all vegetables will need to be peeled, but just like those starchy veggies need a good bath, you’ll need to remove the tough outer peel before eating or cooking.
A quick pro tip about peeling vegetables: while many vegetables that are starchy in nature need to be peeled before use, not all the veggies out there need to be peeled. In fact, some of the skins of vegetables are good for you and contain a lot of nutritional value.
Many times it comes down to a preference, but the skin of a cucumber, for example, holds most of the nutrition. This means peeling away the skin takes away some health benefits.
If you’re really adamant that unpeeled veggies aren’t your thing, try creating a striped pattern with the skin, peeling every few centimeters, so you at least keep some of the skin and nutrients.
Step Three: Slice Off the Ends (Topping and Tailing)
To start evening out your vegetables, slice off the ends. This will give you a straight and even top and bottom and keep all the ends flat. Potatoes are one of the easier vegetables to cut the ends off due to their distinct oblong shape.
For other vegetables, like carrots, cutting off the ends has more to do with trimming the unwanted tops off to keep those bits out of your food. While you may want to cut off the tapered bit at the bottom of a carrot, take caution not to cut them too small.
It will make for more even pieces, but you don’t want to waste parts of the carrot that are good to eat just to make thicker pieces.
Step Four: Cut Crosswise Every Two Inches
You’ve flattened out the bottoms and tops. Now, you can cut two-inch thick pieces that will keep all your veggies the same shape and size. You’ll lay the veggies length-wise, horizontally. This will give you a narrow but long piece to cut.
Starting from the end, measure two inches, cut that piece off, and then repeat the same for the rest of the veggies. This will give you two-inch slices or sticks for your vegetables.
Pro tip: Using your hands and fingers, measure out the two-inch thick cuts before attempting them. This way, you can visualize what you’re going to do and where those cuts will be before you begin.
A common rule in carpentry is to measure twice and cut once. That guideline applies to the basic knife cuts here too.
Step Five: Square Off Your Pieces
A very important detail about the batonnet cut is that all of the pieces look like sticks, and sticks don’t have a rounded side. So in order to keep each piece uniform, you’ll need to create a squared edge.
A great way to do this and keep everything even and uniform is to start by squaring off one edge. Then, turn the vegetable on its side so the flat edge is down on the cutting board. Then cut the next side, and so on, until all four edges are flat.
Once you have a cube of sorts to work with, you can cut it into wide strips. The end result will be ¼-inch thick sticks, so you’ll want to cut the wide pieces ¼ inch in thickness. Repeat this until the entire cube is cut down into flat, wide pieces and set aside.
Step Six: Cut Each Piece at ¼ Inches
Now that you have a bunch of wide ¼ inch thick pieces, it’s time to finish. You can stack a bunch together, but be careful not to stack too many. It can be efficient to try to cut more than one piece at a time, but if you pile them on too high, you won’t be able to control your cuts.
Using your knife, cut the wide pieces into ¼-inch thick strips and set them aside after each piece is complete. Make sure to keep them out of the way, as you could run the risk of accidentally chopping the end off one in your haste or if the cutting board becomes too cluttered.
Once you’ve cut all the wide pieces into small strips, you are ready to go. Your food is ready for stir-fries, French fries, or served raw on a veggie and dip platter. Whatever the case may be, practice will certainly make perfect with this handy technique.
The HexClad Chef’s Knife: Your Sidekick in the Kitchen
We are confident that this how-to guide will get your slicing and dicing like the pros in no time. Your knife skills will help you gain confidence in the kitchen and take your meals to the next level.
Between our tips and tricks and the awesome capabilities of our knives, you’re sure to get the most out of all your ingredients.
Sources:
Are French Fries Truly French? | National Geographic
Chiffonade | Food Literacy Center
Do you Need to Wash Fruits and Vegetables? | Medical News Today


